
Wednesday, 14 November 2012
Framed vintage cutlery
An eclectic mix of antique cutlery in a vintage frame. This is a unique upcycled combination of vintage cutlery from yesteryear presented on a vintage wooden 8" x 10" frame. Each piece is unique, with original markings on the cutlery handles, such as "Cafe Waldorf" and "Woolworths". Knife, fork and spoon are affixed to a hardboard backing painted a dark charcoal, and wooden frame is painted cottage white and slightly distressed. A great DIY project using heirloom or antique store treasures.

I made a number of these framed antique silverware sets with the intention of selling them. I've listed each set for $30 each. If you are interested, please let me know.
Pouches from the cuffs of men's shirts
Here is another upcycle project. Using the cuffs of men's button down shirts, I created a little pouch great for overnight jewelry, coin purse, feminine products or any other purse contents.


Creations with burlap coffee sacks
Burlap coffee sack throw pillows
I was inspired by an online post where a blogger created throw pillows from these authentic bags used to transport the raw coffee beans, including batch and origin markings, and some actually had a few beans left inside. The coffee sacks were first ironed, then cut 2" larger than the size of the pillow insert. Sew a simple seam around three sides, then install the zipper. I then ironed the seams flat.


Burlap coffee bag Christmas tree skirt
I think these burlap coffee sacks make such a great conversation piece, and once I got my creative juices flowing, the projects and uses seem endless. My next project was to create a Christmas tree skirt with the burlap coffee bags. I estimated the size of the finished product in terms of diameter (45"), then cut a piece of Christmas wrapping paper to this size (45"diameter). I cut a hole for the tree in the middle. I then used this as a template or pattern to cut the burlap. There are two options, you can either use one single coffee sack and cut it into a 45" large circle with a hole in the middle OR you can cut panels from several different coffee sack and sew them together. I chose the second method because I wanted to showcase as many of the interesting logos and markings as possible. Sew together the panels and press the seams, then fold over and sew the raw edges around the outside of the piece.


Burlap coffee sack place mats
Using the unprinted sides and ends of the burlap coffee sacks, I cut out rectangle pieces 20" x 14" making sure to cut square to the grain/weave NOT on the diagonal. I then used some neutral fabric as a backing liner (raw edges folded under, liner finished size: 18" x 12"), affixing it to the back of the burlap by sewing machine. Once the backing was affixed, I then carefully frayed the edges by pulling out the woven material on the outside edges. This leaves a 1" fray on all four edges.


Available for purchase
 Burlap coffee sack throw pillows
Most are size: 18"x18"
A few pillows are: 15" x 22"
All have feather or down pillow inserts, most have zipper closures
$30 each

Burlap coffee sack christmas tree skirt
45" circumference
Open flap closure
5 panels of coffee sacks sewn together
$60 each

Burlap coffee sack place mats
Finished size: 20" x 14"
Lined with neutral fabric
$8 each
Contact the artisan directly to arrange local viewing and purchase:
Heather Fulcher
heatherfulcher@gmail.com
Vancouver, BC, Canada
604-618-4829
I was inspired by an online post where a blogger created throw pillows from these authentic bags used to transport the raw coffee beans, including batch and origin markings, and some actually had a few beans left inside. The coffee sacks were first ironed, then cut 2" larger than the size of the pillow insert. Sew a simple seam around three sides, then install the zipper. I then ironed the seams flat.


Burlap coffee bag Christmas tree skirt
I think these burlap coffee sacks make such a great conversation piece, and once I got my creative juices flowing, the projects and uses seem endless. My next project was to create a Christmas tree skirt with the burlap coffee bags. I estimated the size of the finished product in terms of diameter (45"), then cut a piece of Christmas wrapping paper to this size (45"diameter). I cut a hole for the tree in the middle. I then used this as a template or pattern to cut the burlap. There are two options, you can either use one single coffee sack and cut it into a 45" large circle with a hole in the middle OR you can cut panels from several different coffee sack and sew them together. I chose the second method because I wanted to showcase as many of the interesting logos and markings as possible. Sew together the panels and press the seams, then fold over and sew the raw edges around the outside of the piece.


Burlap coffee sack place mats
Using the unprinted sides and ends of the burlap coffee sacks, I cut out rectangle pieces 20" x 14" making sure to cut square to the grain/weave NOT on the diagonal. I then used some neutral fabric as a backing liner (raw edges folded under, liner finished size: 18" x 12"), affixing it to the back of the burlap by sewing machine. Once the backing was affixed, I then carefully frayed the edges by pulling out the woven material on the outside edges. This leaves a 1" fray on all four edges.


Available for purchase

Most are size: 18"x18"
A few pillows are: 15" x 22"
All have feather or down pillow inserts, most have zipper closures
$30 each
Burlap coffee sack christmas tree skirt
45" circumference
Open flap closure
5 panels of coffee sacks sewn together
$60 each
Burlap coffee sack place mats
Finished size: 20" x 14"
Lined with neutral fabric
$8 each
Contact the artisan directly to arrange local viewing and purchase:
Heather Fulcher
heatherfulcher@gmail.com
Vancouver, BC, Canada
604-618-4829
Throw pillows from men's shirts
I found a few men's button down shirts at the local thrift shop, and decided to turn them into throw pillows. First, measure the pillow insert. Cut the front and back panel of the shirt about an 1" larger to allow for seam allowance. Place right sides together and sew together with 1/2" seam allowance. Instead of trying to align the patterns front and back, I turned the back fabric panel so the patterns ran opposite.


Saturday, 13 October 2012
Melted crayon pumpkin
This is a no-carve pumpkin design, which you would think would make it less messy. Think again. The first step is to find a white pumpkin.
Next, place newspaper or other protection about 5 feet around your working area. I recommend working in your garage or somewhere you can make a mess.
Take a package of crayons and peel off the paper wrapper.
Arrange the crayons in order of the colour spectrum. Red/Purple/Blue/Green/Yellow/Orange/Red
Hot glue the crayons on the top of the pumpkin in the order of the colour spectrum.
Melting crayons:
- I used a hairdryer on high heat but low fan, and found that this sprayed the wax around and I had to be careful to pull away when the drips formed.
- I also used a creme brule torch and a barbeque lighter at times through the melting process.
- I think the best thing to use is an heat embossing gun


Friday, 10 February 2012
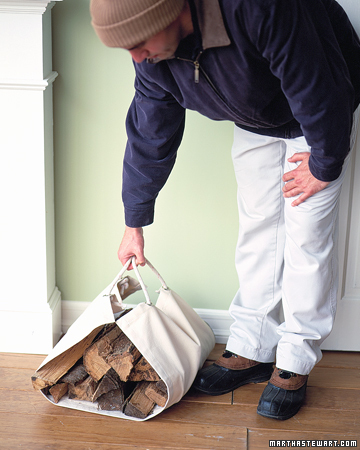
Firewood carrier
I'm a big fan of Martha Stewart, although that might be obvious by now. This firewood carrier project was featured on one of her TV segments, and inspired me to make my own.

As always, I decided to modify it slightly, to use dowels for handles instead of cord with grommet holes. I found this image on the Internet, and again, modified it slightly to allow a larger opening for the hand.


As always, I decided to modify it slightly, to use dowels for handles instead of cord with grommet holes. I found this image on the Internet, and again, modified it slightly to allow a larger opening for the hand.
I chose a thick canvas fabric, and only needed 1/2 metre in total. I selected a 1" dowel at my home improvement store, 2 lengths of 20". I cut the fabric as follows, turned and sewed the raw edges on the long side and the hand opening. I folded the strap sides over the dowels and sewed them.

And voila:


Thursday, 2 February 2012
Corner kitchen table
I was commissioned to design and furnish a basement apartment to stage it for potential renters. The kitchen posed the biggest challenge. Although it is a relatively large (12'x12') space, it is awkwardly shaped, and it also functions as a hallway to the master bedroom. I knew it had potential to be an eat-in kitchen, but it won't work to have a stand-alone table and chairs. I decided to make a custom table by cutting a triangle notch from a round solid wood table top.
To test if my idea would work, I first cut a peice of cardboard to the proposed size and shape and tested it in the space. It's going to be perfect!


I found the perfect size tabletop for $10 at a hotel furniture liquidator. I painted the table top with some semi-gloss white paint that I had on hand.
Then, with the help of my handy-man partner Rich, we marked then cut the table top with a skill saw. I bought a single table leg from IKEA for $7.50. The table leg was attached, and then the table top was bracketed to the wall for stability. Two matching chairs were purchased on Craigslist for $10each.


To test if my idea would work, I first cut a peice of cardboard to the proposed size and shape and tested it in the space. It's going to be perfect!


I found the perfect size tabletop for $10 at a hotel furniture liquidator. I painted the table top with some semi-gloss white paint that I had on hand.
 |
| Pre-paint |
 |
| Post-paint |
Then, with the help of my handy-man partner Rich, we marked then cut the table top with a skill saw. I bought a single table leg from IKEA for $7.50. The table leg was attached, and then the table top was bracketed to the wall for stability. Two matching chairs were purchased on Craigslist for $10each.


Subscribe to:
Comments (Atom)